Operator/Chairperson Dashboard
The Dashboard is the first page the user sees when they log in. Here you can manage your meeting. You can see the active speakers and the request list, but also activate and mute microphones.
The available content on the Dashboard depends on what the Technician configured in Role management. See Role Management.
Dashboard elements
The Dashboard consists of three large blocks:
- Speaker list: current speakers
- Request list: participants requesting to speak
- Voting results (online during voting sessions): voting results in real time
- Room layout: image of the room with all seats and participant's names on the seat
The below image applies to the Wired version only: ![]()
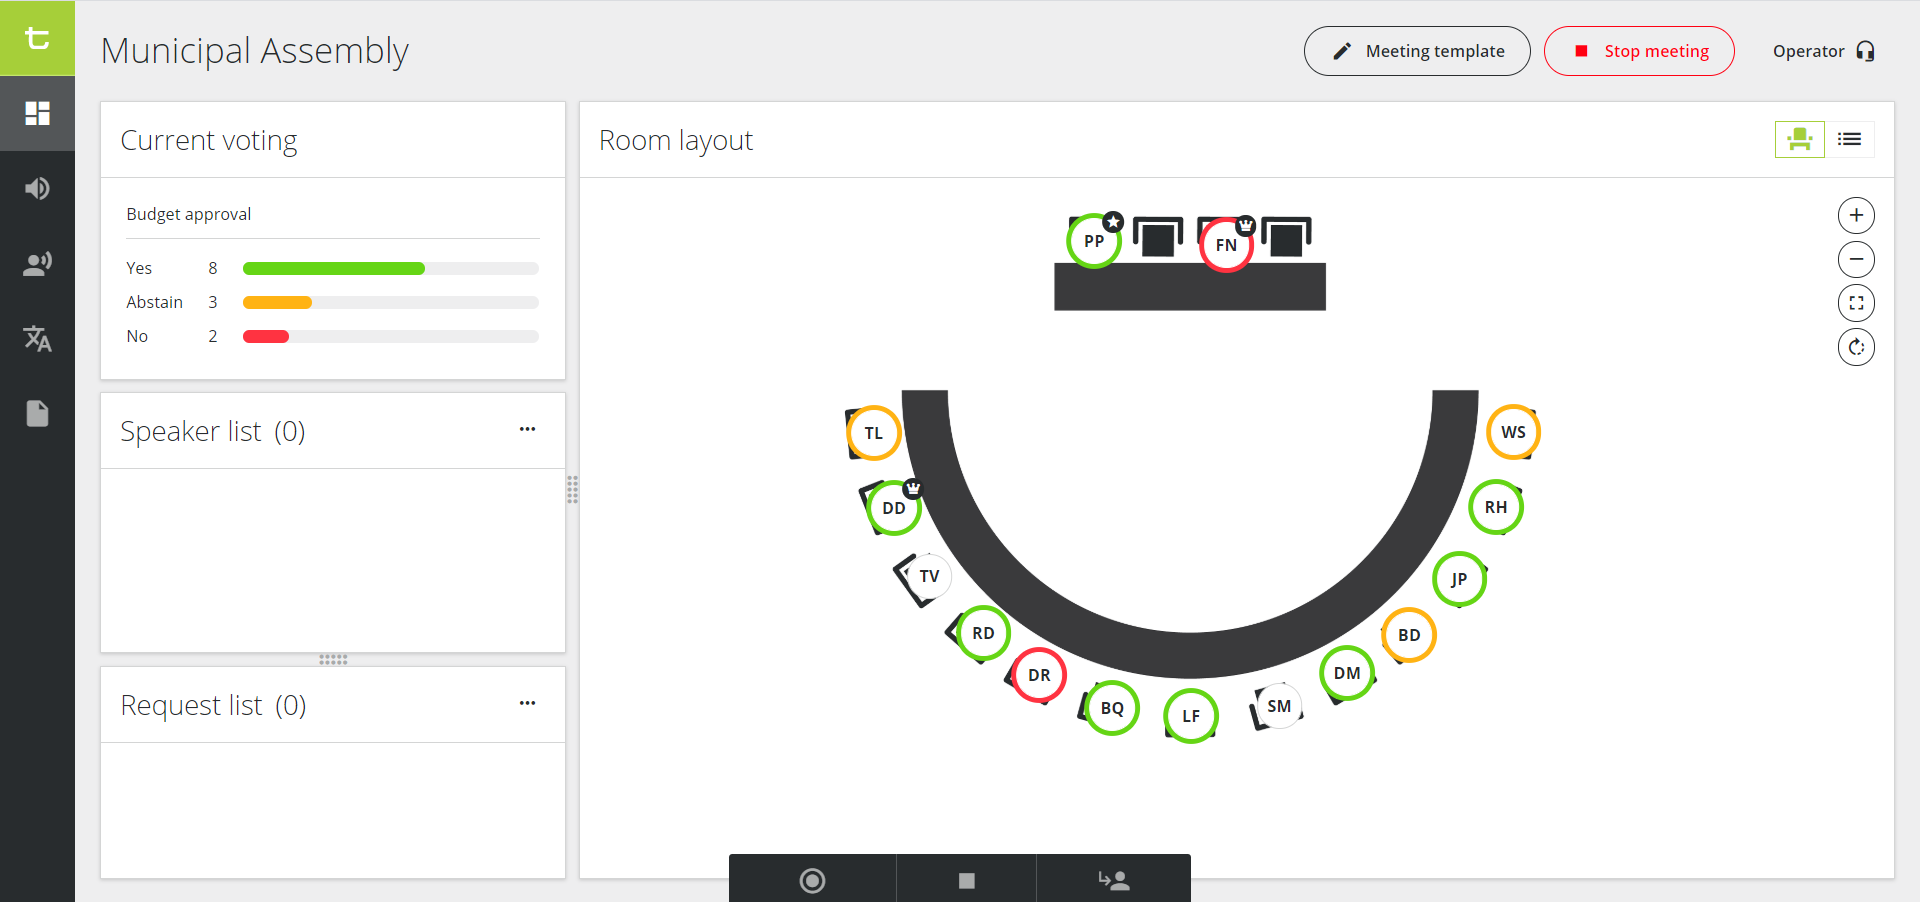
Figure 1-1: Dashboard of the Chairperson and Operator with Room layout, and speaker and request list
The below image applies to Confidea G4 Wireless only: ![]()
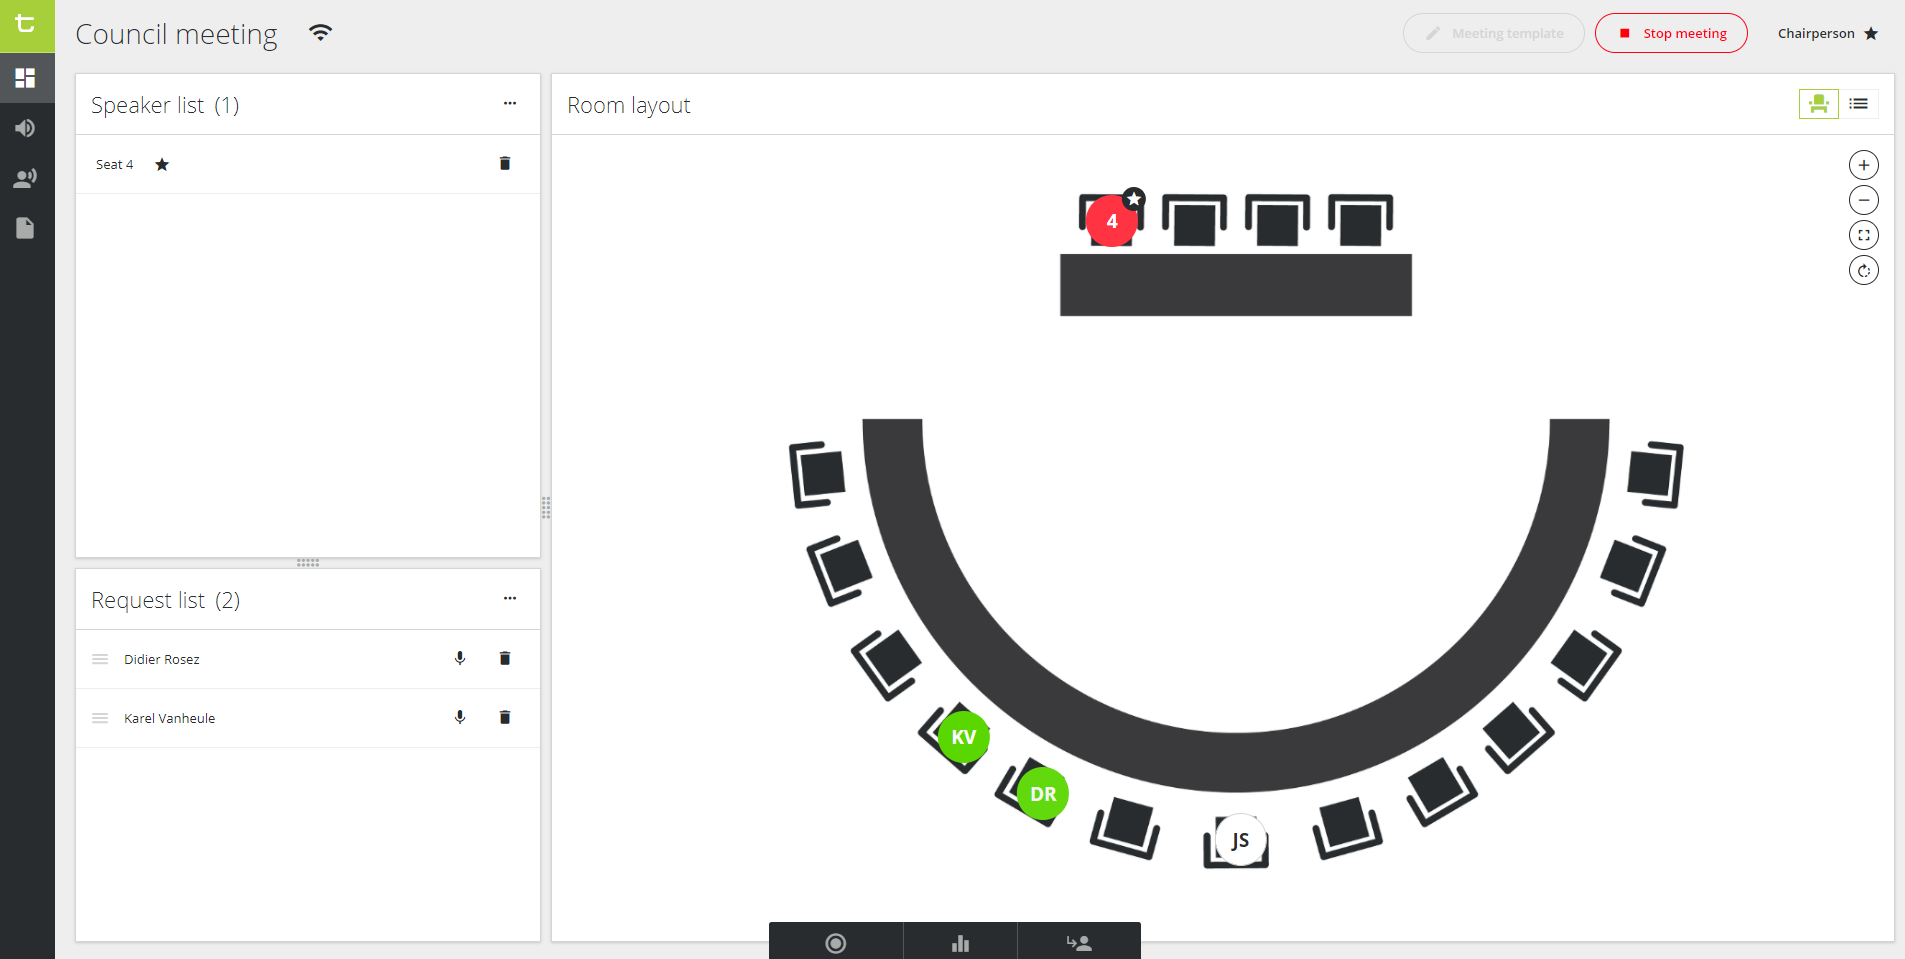
Figure 1-2: Dashboard of the Chairperson and Operator with Room layout, and speaker and request list
Only for G4 an extra icon ![]() is added. When hovering over the icon, you can see the following information:
is added. When hovering over the icon, you can see the following information:
- Channel number
- 2.4/5GHz range
- Signal quality (bad, medium or good)
- Whether channel is a DFS channel
You can change the size of the different elements by using the handles between the different boxes.
Speaker list
This block shows all active microphones. Next to each active microphone, you can see the Remove icon ![]() to remove participant from the speaker list, thus deactivating the microphone. When you click the More icon
to remove participant from the speaker list, thus deactivating the microphone. When you click the More icon ![]() on top of the speaker list, you can:
on top of the speaker list, you can:
- Remove delegates: this deactivates the microphone of all delegates, but leaves the microphone with VIP and chairperson priority active.
- Clear speaker list: deactivates all microphones.
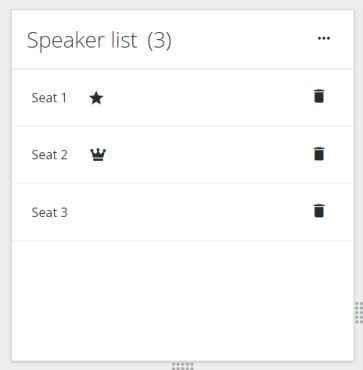
Figure 1-3: Speaker list
Request list
This list shows all participants that requested to speak. Note that this list is only available when the Microphone mode is set to Request. Click the microphone icon ![]() next to the participant to activate the microphone, or click the Remove icon
next to the participant to activate the microphone, or click the Remove icon ![]() to cancel the request. To cancel all requests, click the More icon
to cancel the request. To cancel all requests, click the More icon ![]() on top of the list and select Clear request list.
on top of the list and select Clear request list.
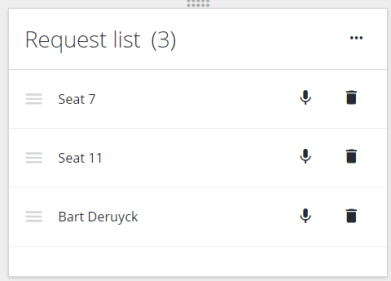
Figure 1-4: Request list
Room layout
This bloc shows an image of the actual room. Here you can see all seats and their microphone status. Per seat, you can view the following information or perform the following actions:
- See microphone status: active (red) or in request (green)
- See which seat is the first one in the request list: blinks green
- See the seat priority:
 : Chairperson
_30x30.png) : VIP
: VIP
- Activate the microphone by clicking on the seat
- See the participant name by hovering over the seat
- Click the More icon next to the participant name to:
- See the seat ID
- Change the Microphone sensitivity (wired systems only
 )
) - Add the seat to the request list (delegate only)
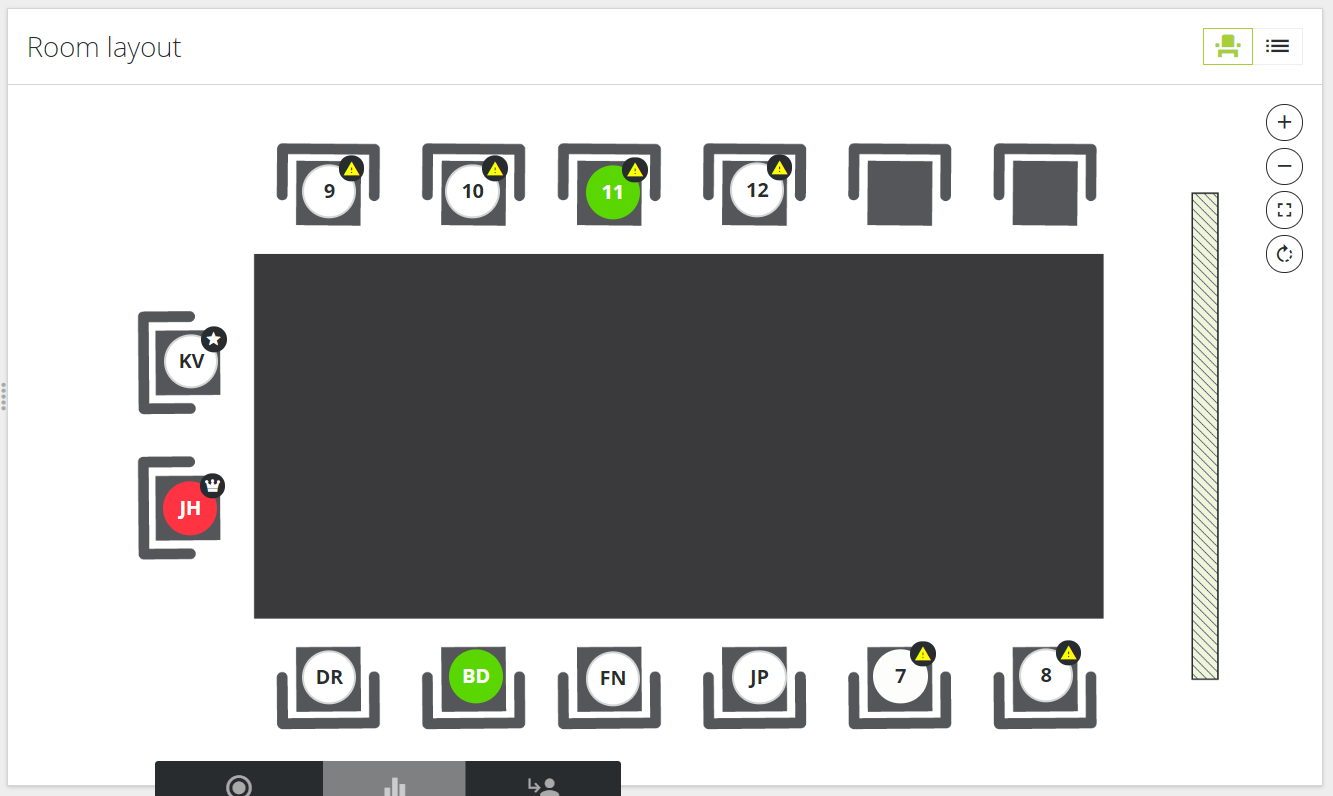
Figure 1-5: Example of Room layout
Participant list
This list shows all participants, you can access it by clicking the list icon ![]() in the top right corner of the Room layout window. Per participant, you can see the following information or perform the following actions:
in the top right corner of the Room layout window. Per participant, you can see the following information or perform the following actions:

- The circle on the left shows the participant initials and the priority. If you click the circle, you can activate or deactivate the microphone.
- The second column shows the full name of the participant.
- The third column shows the seat ID.
- When you click on one of the rows, a details pane appears on the right side of the screen. This shows:
- The same information as in the row: initials, participant name, priority, microphone control, etc.
- A slider to change the microphone sensitivity.
- The button Remove from request list to remove the seat from the request list.
- The button Edit delegate (only available when the meeting is running): click to change the name of the delegate.
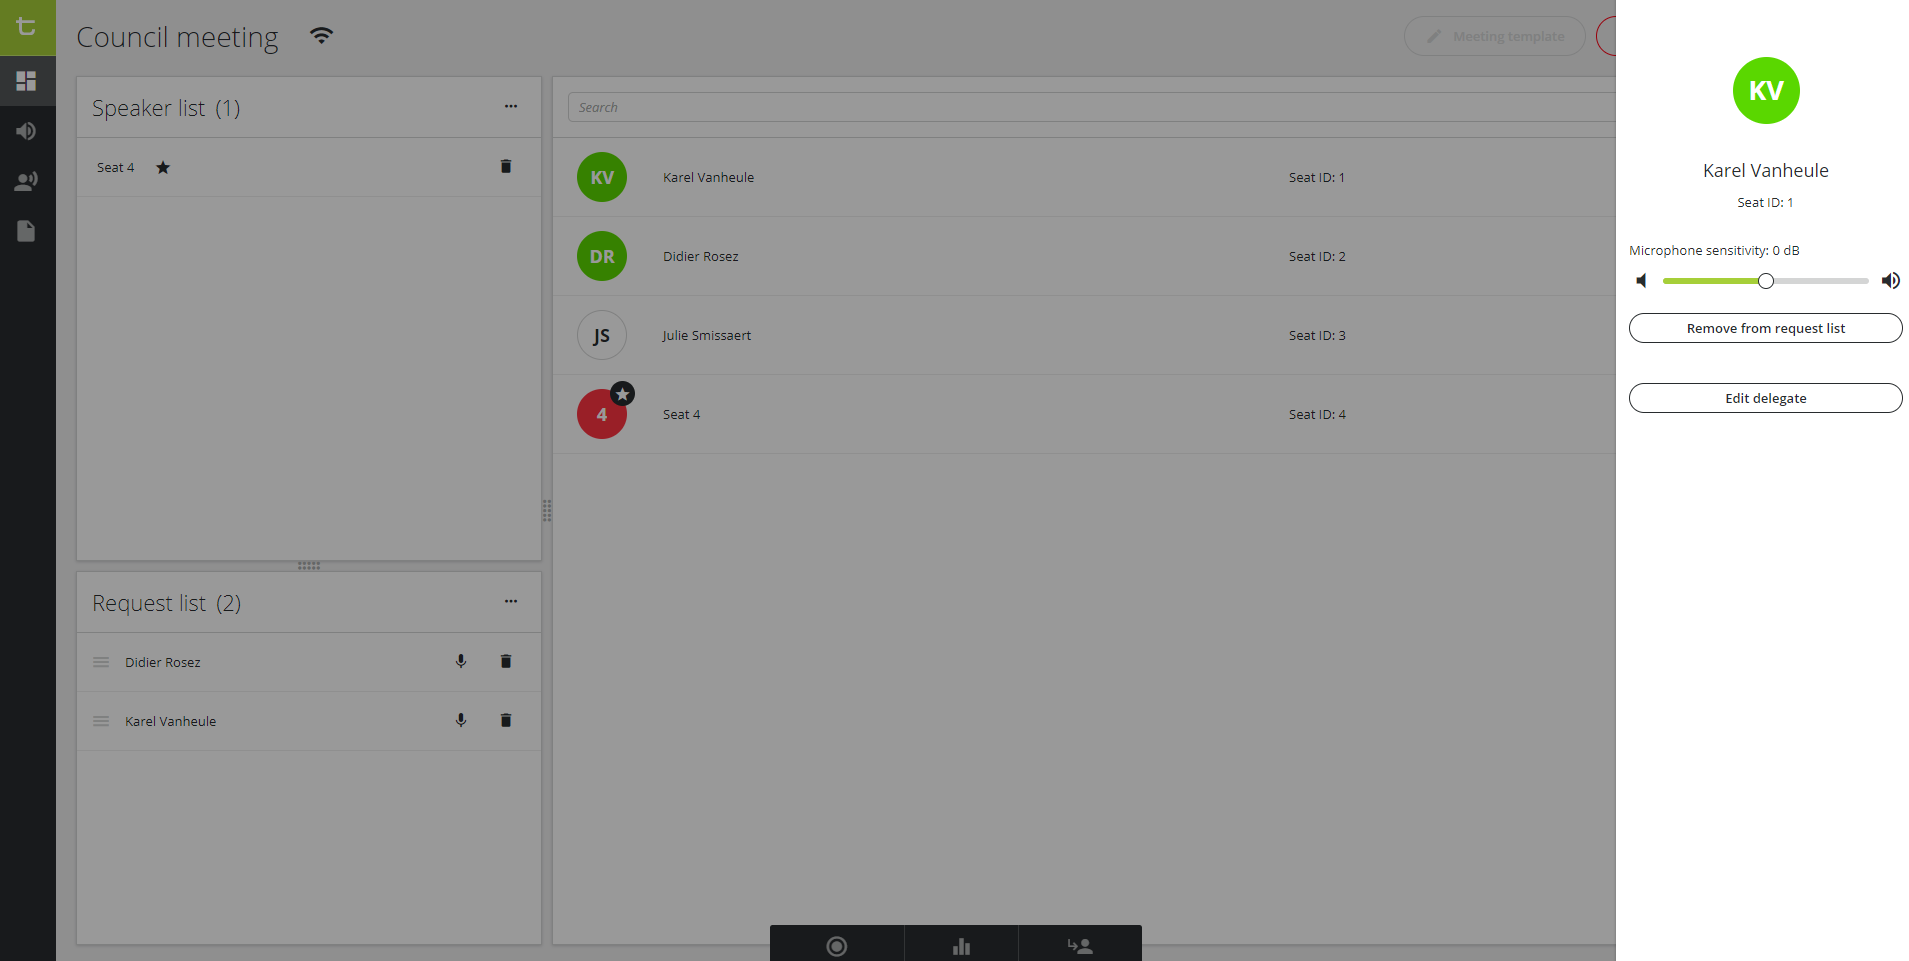
Figure 1-6: Participant details
Meeting template
In the Meeting template, you can add participants to your meeting and assign them to a seat. If your meeting requires authentication, this is the place to assign the badges to the correct person. There are two views in the meeting template:
- Room layout: assign participants to a specific seat on the layout
- List view: assign participants to a specific seat and configure badges
It's not possible to edit the meeting template when the meeting is active.
Room layout
In the room layout view (![]() ) of the meeting template, you can:
) of the meeting template, you can:
- Give a name to the meeting template (1).
- Add participants: by clicking the Add button on the bottom of the list (2). Specify the first and last name of the participant (3).
- Remove participants by clicking the remove icon (4).
- Assign participants to a seat on the room layout (5): drag and drop one of the participants from the list on the left to one of the seats in the room layout on the right.
- To remove a participant from a seat, click on the assigned seat in the room layout and click the more icon. Select Remove delegate from seat (5).
- To record the meeting, click the settings icon
 and select Recording > On (6).
 - Save the template (7).
.png)
Figure 1-7: Editing the room layout
List view
In the list view (![]() ) of the meeting template, you can:
) of the meeting template, you can:
- Give a name to the meeting template (1).
- Add participants: by clicking the Add button on the bottom of the list (2). Specify the first and last name of the participant (3).
- Assign a badge to a participant by inserting and removing a badge in the unit, while selecting a participant (4).
- Assign participants to a seat by selecting one of the seats from the dropdown list (5).
- Remove participants by clicking the remove icon (5).
- To record the meeting, click the settings icon and select Recording > On (6)
- Save the template (7)
Figure 1-8: Editing the room layout in list view
Turn Off All G4 Units 
If there is at least one G4 unit present in the system, either in standalone mode or in coupled mode, a More icon ![]() appears next to the tiles and list view icons:
appears next to the tiles and list view icons:
![]()
Click the More icon ![]() and select Turn off all G4 units if needed.
and select Turn off all G4 units if needed.
Meeting control
Start/Stop meeting
Click the large button on top of the screen to Start meeting.

When you click Start meeting, a dialog box appears where you can select which meeting template to use and the meeting title.
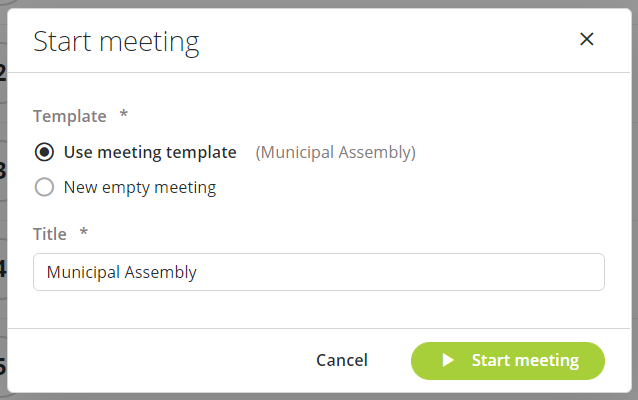
Figure 1-9: Start meeting window
To stop the meeting, click Stop meeting on top of the screen and confirm.

Use the meeting control buttons
On the bottom of the screen, there are three buttons for meeting control that are always visible. Depending on the state of your meeting, different options are available:
- Start/Stop recording: this button allows you to manually start and stop the recording of the meeting.
- Start/Stop/Close voting: use these buttons to control your voting sessions. See Manage Voting sessions.
- Next speaker: use this button to activate the microphone of the next person in the request list.
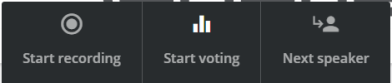
Figure 1-10: Meeting control buttons
The buttons are always available but minimized when you don't use them.
Which buttons are available depends on the type of central unit you are using (no recording on Plixus Multimedia central unit) and the discussion mode (next speaker only possible for discussion modes with request list).
Manage Voting sessions
Confero offers basic voting sessions. To start your voting session:
- Click Start voting in the meeting control bar on the bottom of the window.
- The New voting dialog box opens where you can set the following voting parameters:
- Voting question (optional): define the topic you want to vote on and which is displayed on the signage.
- Which answering option do you want: define the number of voting options.
- Secret voting: select this option if you want to remove all traces of the voting results after the voting ends.

Figure 1-11: New voting window
- Click Start voting. The participants can now vote on their unit.
- Confero shows the progress of the voting session, and the number of people who voted. On the Room layout, you can also see the individual voting results by the color of the circle around the seat.
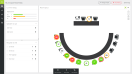
Figure 1-12: Example of voting results
- Click Stop voting to end the voting session.
- Click Close voting to remove the voting results from the view and signage.
