Audio Settings
On the Audio page, you can configure all audio settings in the Confero system. To access the audio settings, click the audio icon in the menu on the left ![]() .
.
The Audio Settings page consists of three tabs:
-
Audio, where you can define the general settings,
-
Audio routing, where you can set the routing configurations,
-
Audio input pre-processing, where you can define the pre-processing properties of the delegate microphones.
Audio
In the first tab of the Audio menu, you can set the default headphone and loudspeaker volume, the auxiliary input and output gain and the auto gain reduction.
Figure 1-1: Audio page
Volume
You can set the default headphone volume of the delegate units at start-up. The position of the slider indicated on the web interface will be the same as the slider position on the delegates units.
Click on the Push to units button to apply the default headphones volume to the delegates units.
Auxiliary volume control
The gain of the auxiliary inputs and outputs can be adjusted using the slider to obtain the required input and output level. When set to 0 dB, the maximum level is equal to the level defined in the datasheet of this equipment.
The slider button at the right of the slider can be used to preserve the gain setting while turning the input/output on (active) or off (muted).
Auto gain reduction
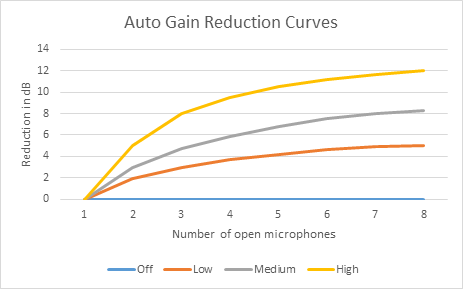
Auto gain reduction reduces the gain of all open delegate microphones depending on the amount of open microphones. When the number of open microphones is increased, feedback between the open microphones and the loudspeakers can occur. Depending on the situation, a reduction of the microphone gain is needed to avoid this feedback.
In wired systems ![]() , gain sharing is applied on all open microphones to avoid feedback between the open microphones and the loudspeakers. Therefore, the auto gain reduction is off by default. The advantages of gain sharing are the following :
, gain sharing is applied on all open microphones to avoid feedback between the open microphones and the loudspeakers. Therefore, the auto gain reduction is off by default. The advantages of gain sharing are the following :
-
Noise reduction: there is less background pickup from the open microphones, as the gain of the open microphones is reduced when there is no input signal.
-
Larger feedback margin and less automatic gain reduction when more than one microphone is open.
Wireless systems ![]() do not apply gain sharing on the open microphones. In this case, the auto gain reduction must be set according to the room properties. A good starting point is using the low curve. When the low setting is not sufficient, try medium or high.
do not apply gain sharing on the open microphones. In this case, the auto gain reduction must be set according to the room properties. A good starting point is using the low curve. When the low setting is not sufficient, try medium or high.
Audio Routing
With audio routing, control all routing configurations. You can configure the following settings:
- Audio routing configuration
- Automatically route interpretation channels to Dante
- Advanced audio
Figure 1-2: Audio routing page
Audio routing configuration
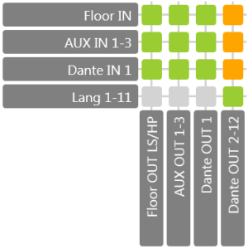
By default, there are five preconfigured basic routing options. Each routing type is explained with a descriptive text and a picture of the routing matrix.
All language channels that you configure in the web server can be automatically routed to Dante when you select the checkbox Automatically route interpretation channels to Dante. This means the following for the Dante channels: the floor is always routed to channel number 1. From then on, with the option activated, the other x language channels follow on channel 2 until x+1.
The DSP and hybrid modes are not available for wireless devices.
Normal
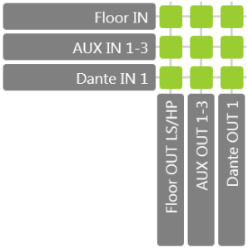
Standard audio routing.
|
Interpretation channels to Dante |
Description | Figure |
|---|---|---|
|
No |
Delegate microphones + AUX IN 1-3 + Dante IN 1 to: - Delegate loudspeakers and headphones - AUX OUT 1-3 - Dante OUT 1 |
|
|
Yes |
Delegate microphones + AUX IN 1-3 + Dante IN 1 to : - Delegate loudspeakers and headphones - AUX OUT 1-3 - Dante OUT 1 - Language backu - Language channels 1-11 to Dante OUT 2-12 |
|
Distance conferencing
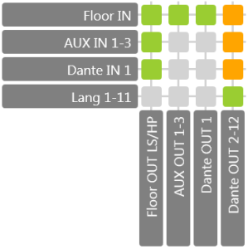
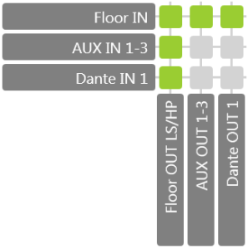
Use this audio routing when you want to connect two rooms with each other. This adds an external signal via AUX IN to the local floor signal, and sends the local floor signal via AUX OUT to a a different room.
This routing is not useful when there are more than two rooms.
|
Interpretation channels to Dante |
Description | Figure |
|---|---|---|
|
No |
Delegate microphones + AUX IN 1-3 + Dante IN 1 to : - Delegate loudspeakers and headphones Delegate microphones to : - AUX OUT 1-3 - Dante OUT 1 |
|
|
Yes |
Delegate microphones + AUX IN 1-3 + Dante IN 1 to : - Delegate loudspeakers and headphones - Language backup Delegate microphones to : - AUX OUT 1-3 - Dante OUT 1 Language channels 1-11 to Dante OUT 2-12 |
|
Hybrid conferencing 
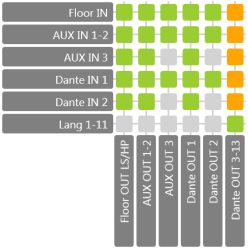
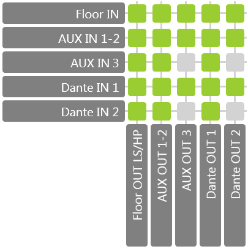
This audio routing is a combination of the standard routing and distance conferencing routing. It allows you to add an external microphone to the system to be heard on the remote side without feedback.
|
Interpretation channels to Dante |
Description | Figure |
|---|---|---|
|
No |
Delegate microphones + AUX IN 1-3 + Dante IN 1-2 to : - Delegate loudspeakers and headphones - AUX OUT 1-2 - Dante OUT 1 Delegate microphones + AUX IN 1-2 + Dante IN 1 to : - AUX OUT 3 - Dante OUT 2 |
|
|
Yes |
Delegate microphones + AUX IN 1-3 + Dante IN 1-2 to : - Delegate loudspeakers and headphones - AUX OUT 1-2 - Dante OUT 1 - Language backup Delegate microphones + AUX IN 1-2 + Dante IN 1 to : - AUX OUT 2 - Dante OUT 2 Language channels 1-11 to Dante OUT 3-13 |
|
External equalizer
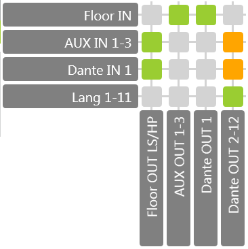
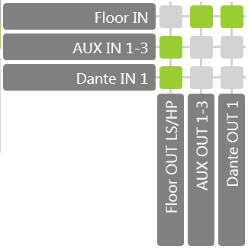
This option allows you to process the floor with an external device. The microphones are not routed to the loudspeakers.
|
Interpretation channels to Dante |
Description | Figure |
|---|---|---|
|
No |
Delegate microphones : - AUX OUT 1-3 - Dante OUT 1 AUX IN 1-3 + Dante IN to : - Delegate loudspeakers and headphones |
|
|
Yes |
Delegate microphones : - AUX OUT 1-3 - Dante OUT 1 AUX IN 1-3 + Dante IN to : - Delegate loudspeakers and headphones - Language backup Language channels 1-11 to Dante OUT 2-12 |
|
DSP 
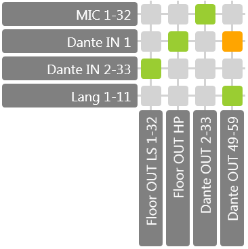
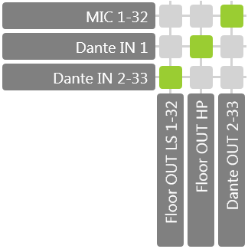
This option allows you to route all the microphones to fixed Dante OUT channels. The audio path of the microphones can be configured to be active at all time, in this case the microphone audio path will not be controlled by the microphone button. The indicator and the microphone LED ring will be controlled by the microphone button. The LED control can be managed via the API.
The loudspeaker and headphones channel is assigned to a fixed Dante IN channel.
The loudspeaker channels are created by external DSP and injected into Plixus via Dante. The loudspeakers are not muted when the microphone is active.
The channel selector and AUX OUT channels are mapped to a dedicate Dante channel/
The active speaker can be visualized on signage, on the FLEX units and the uniCOS units.
This option can be implemented on 32 units max.
|
Interpretation channels to Dante |
Description | Figure |
|---|---|---|
|
No |
Delegate microphones 1-32 to Dante OUT 2-33 Dante IN 1 to : - Delegate headphones Dante IN 2-33 to Delegate loudspeakers 1-32 |
|
|
Yes |
Delegate microphones 1-32 to Dante OUT 2-33 Dante IN 1 to : - Delegate headphones - Language backup Dante IN 2-33 to Delegate loudspeakers 1-32 Language channels 1-11 to Dante OUT 49-59 |
|
Custom Audio Routing
It is possible to get a custom audio routing configured by either Televic Conference or a technical integrator. In that case, the Audio routing and Audio input pre-processing tabs cannot be changed and are displayed as follows:
Figure 1-3: Audio - Audio Input Pre-processing - Custom Configuration
Figure 1-4: Audio - Audio Input Pre-processing - Custom Configuration
Advanced Audio Settings 
The Advanced Audio Settingsare not available for wireless devices.
The Advanced Audio settings section is closed by default. Click on ![]() to open the advanced settings.
to open the advanced settings.
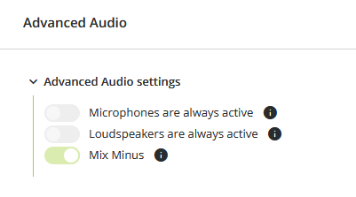
All following options are disabled by default:
-
Microphones are always active: the audio path from local microphones is always on. This option is mainly applicable for the DSP mode.
-
Loudspeakers are always active: the audio path to local loudspeakers always on. This option is mainly applicable for the DSP mode.
-
Mix Minus
 : the loudspeaker is not muted when the microphone is active. This option is recommended to be active in all modes except for DSP and external equalizing modes. It is used for optimal intelligibility. The loudspeaker channel is dynamically created for each active microphone (or mix of "other" microphones in each input group). The loudspeaker is not muted when the microphone is active so that the delegate can hear the other participants speaking (e.g. social distancing or court applications) as well as far-end while their own microphone is active. When you enable the Mix Minus option, the slider button for microphones and loudspeakers is always inactive.
Hover over the ![]() icon for more information about each option.
icon for more information about each option.
audio Input Pre-processing
The Audio Input Pre-processing settings are global settings that are applied to every delegate microphone unit individually. These settings determine the dynamic range of the audio input.
Figure 1-5: Audio - Audio Input Pre-processing
Dynamics
There are five default presets available for the user. They only apply to the delegates units. For a detailed description of these presets, see the list below:
- Disabled: No dynamics processing is applied on the delegate microphone inputs. In DSP mode, this setting will allow external dynamics.
- Default: This dynamics is the starting point for a normal conference room without external loudspeakers. A large variation of the loudness of a common voice will result in a small variation of the signal used in the system. When there is no microphone input signal, the noise gate will be activated to prevent environment noise pickup.
- Default (without noise gate): removes the noise gate. To be used when the noise in the room is limited.
- External speakers: shifts the knee-point of the compressor stage to a higher input value resulting in less chance of feedback when external speakers are used.
- External speakers (without noise gate): same settings as external speakers, but without the noise gate.
The dynamics of the interpreter units are always on default.
Bass cut
You can cut the bass by putting the slider on the active position. When the bass cut is active, a high pass filter at 200 Hz is activated to reduce the low frequency content. It will prevent applying high energy content by the low frequencies to the headphones, resulting in more comfort and higher intelligibility.


